

Wie können Sie Remote-PCs überwachen?

Using AIDA64 Remote Monitor (available only in AIDA64 Business), we can monitor the activity and the “health” of networked computers and intervene, if required.
We must configure the firewall before using this feature.
Connection
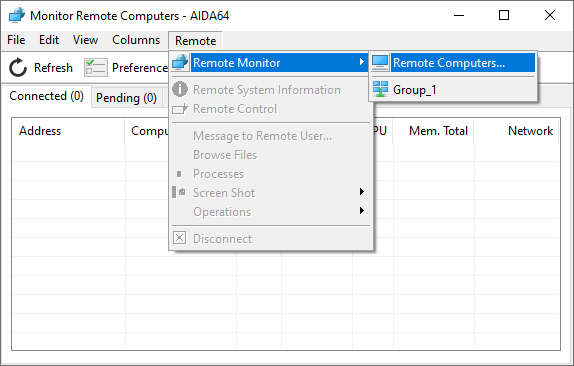
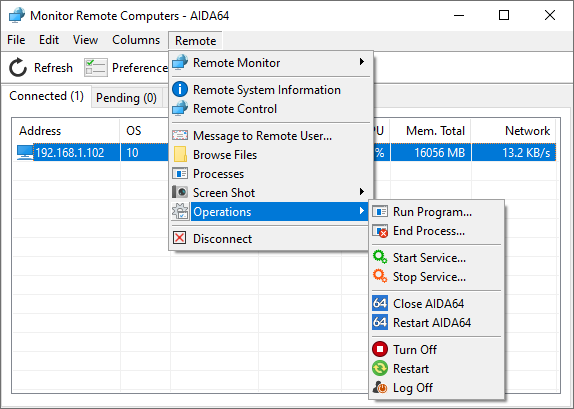
To use this feature, we need to open the Monitor Remote Computers dialog by selecting Remote / Remote Monitor on the menu bar. Here we will be able to connect to those PCs on which remote connections are allowed. In the screen shot, we can see that connection has not been established with the remote computer. To establish a connection, we need to right-click on a blank area in the window to activate the context menu, go to Remote Monitor then select “Remote Computers”.
Here we can select one or more computers using an IP address or computer name. If we have more networks in use, we can select the name of the network or specify an IP address range.
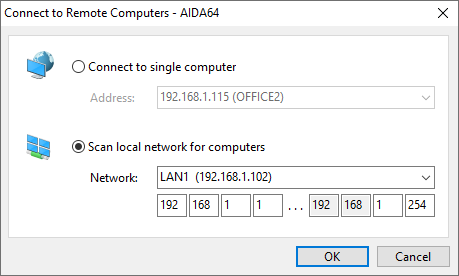
After pressing “OK”, we will see the IP addresses of those PCs listed in the Pending tab to which AIDA64 is trying to connect. Those client computers to which connection was successfully established will be listed in the Connected tab. Should there be any remote PCs to which somebody else has already connected the IP address of these will appear in the Busy tab, while those computers to which AIDA64 could not connect are listed in the Error tab. In the Disconnected tab, we can see the IP address of those computers to which we have already connected.
On the client computers, a bubble above the notification area will appear to inform the user that there was a successful or unsuccessful attempt to establish a remote connection. During the remote session, the AIDA64 icon in the notification area will turn red. It is possible to hide the bubble notification and the icon using the /SILENT command-line option.
On the Connected tab, the following information is shown by default for remote computers:
- IP address or computer name. The icon indicates that the remote computer is a server or a client or a portable computer.
- Computer name
- The name of the logged-on user
- Operating system version
- Uptime since last Windows launch
- Idle time, that is the time since the user has not used the computer
- CPU usage
- Total and free memory
- Total and free disk space
- HDD SMART status
- Network usage
- Anti-virus status
- Number of running processes
- Active window
Clicking Preferences and then the General tab, we can enable/disable the grid lines, select GB as the preferred disk space measurement unit, and specify 5 processes and 5 services we would like to monitor. On the Update tab, we can specify how often we would like to update the information in the columns (in seconds). While the columns selected on the Columns tab will be displayed in the Monitor Remote Computers module. By default, all columns are selected.
Creating computer groups
On the tab Computer Groups, we can create computer groups. There are three ways to add computers to a group:
- computer name (eg. “ADMINPC”)
- IP address (eg. “192.168.0.8”)
- IP address range (eg. “192.168.0.1-192.168.0.21”)
It is possible to add multiple addresses if we separate them by comma, but we can create more elements as well.

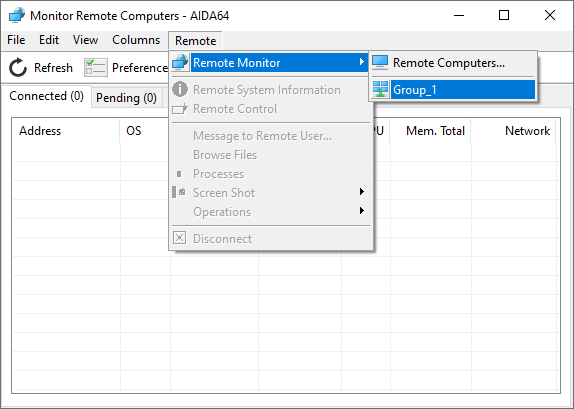
The groups created here can be selected in the Monitor Remote Computers module by right-clicking a blank area and selecting Remote Monitor.
Remote System Information
The feature Remote System Information is also available in this module. This way AIDA64 Business can provide us with detailed hardware and software information from remote computers as well. During the remote connection session, we will see the details of the remote machine both in the Page menu and the information window. You can read more about this function here.
